 |
Cheltenham Society
of Model Engineers |
Next Public Afternoon
(1330 - 1600hrs) |
|
| Superheaters |
  |
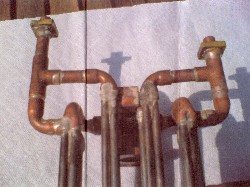
One of the biggest disadvantages with the radiant type of superheater for model use is that it is usually necessary to find someone who can T.I.G. weld the hot return bends, i.e. those in the melting pot, if you see what I mean.
The reason for this is that silver brazing them is only satisfactory for a very short period of time; and as most of you are aware, it is crevice corrosion that is the cause of all our disappointments.
Members may, therefore, be interested in the superheaters I have made up for the Garratt, where no T.I.G. welding has been used.
|
 |
The superheater elements are designed to fit into 7/8" OD flue tubes, and there are four of them. Each flue contains two elements - out and return (a 26ft length of superheater element in total).
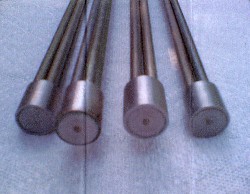
The elements consist of 6mm dia. Stainless Steel tube by 1mm wall thickness. They are threaded M6 x 0.5 for a length of 5/16", making sure the thread will be a tightish fit (make the return ends first to use as a gauge). Incidently, I work mainly in imperial measurements, but drop in metric when it suits me, I'm sure you'll understand why!
The threaded end is, of course, the hot end which will be screwed into the return ends in due course.
|
 |
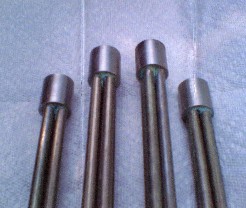 |
The return ends are turned from Stainless Steel bar. They are 0.730" dia. x 7/8" long. Bore to dia. to suit 5/8" x 26t.p.i. (Tap and Die available from Tracy Tools Ltd). Bore to a depth of 9/16" flat bottom, and thread 5/16" deep with the 5/8" x 26 Plug Tap.
On the solid end, drill and tap four holes equi-spaced on a 0.710" p.c.d. (i.e. mark a parallel line 1/4" above and below the C/L of the bar. Rotate 90 degs and repeat). At the four intersecting points make a centre punch mark. Drill and tap into the C/Bored End, drill 5.0mm dia. and tap 6mm x 0.5. These are the parts to use as your gauge.
|
The plugs are simply turned from Stainless Steel Bar and threaded 5/8" x 26 t.p.i., again making sure the threads are on the tight side. I parted the plugs nearly off the bar leaving a neck of about 5/32" thick and screwed the plugs in with a smear of Boss White until the plug twisted off.
When assembling the elements you'll need to make them all a bit longer than each other, so as to grab hold of them - a tap holder is good - and start by assembling the shortest. Give each a smear of Boss White and 'graunch' them in as tight as you can without stripping the threads. Finally cut to length to suit the pipework at the smokebox end. |
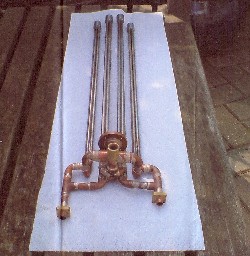 |
I do all the bendy bits in copper tube and sleeve the two together using about a full diameter of overlap on each piece.
Now I know the Garratt has not turned a wheel yet, but I have used the basic principle of the supereaters on my 'Princess Marina', and they have been in for a few years, so I'm fairly hopeful that the 'Garratt' ones will be OK too. Time will tell!
Please let me know how you get on if you give them a try, I'll be interested to hear.
BOB JONES

|
� |